

PREPPING THE SOLAR POOL PANELS
ON THE GROUND
STANDARD SHINGLE ROOF INSTALLATION
Six Vortex 4' x 12' Panels | One Panel Array | South Facing Roof
PREPPING THE VORTEX PANELS
Preparing the solar pool panels before you bring them on the roof is a very smart idea and will save you a significant amount of time and trouble. The idea is to do as much of the work on the ground before going up on your roof to install the panels.
First lay out the solar panels on the ground like the picture below with the Vortex sticker on the panel facing the ground.

Note: Vortex solar pool panels can be installed either side up, and can be reversed after five or more years to lengthen its life.
RUBBER COUPLING INSTALLATION
Using the parts from the Standard Panel Hardware Kits, install the 3" Rubber Couplings on the top & bottom header outlet as shown in the picture bellow. Notice that the header outlet has a groove near the end. Install a Stainless Hose Clamp over each Rubber Coupling and position it over the groove; position the head of each clamp facing out and up for easy access, then tighten until snug..


Complete the rubber couplings installation by adding the final 2 rubber couplings to the top panel in the pile. In this example, the top panel is the only panel that should have a rubber coupling installed on all four corners. The rest of the panels should only have 2 rubber couplings installed on the same side, top and bottom headers. See Diagram below.

TOP HEADER HOSE CLAMP PREP
Each rubber coupling connected to the top panel headers receives 3 hose clamps. Two of the hose clamps seals the rubber coupling to the solar pool panels and the 3rd hose clamp located in the middle of the rubber coupling mounts the rubber coupling/panels to the roof.
TOP HEADERS ONLY
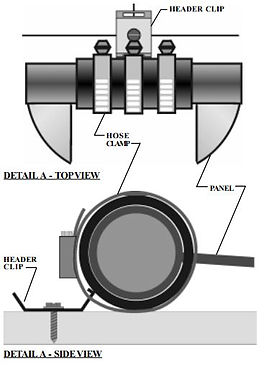
Before installing the solar panels on the roof it is better to prep on the ground some of the hose clamps by attaching a stainless steel header mounting clip to each one. A six panel Vortex system, installed in one panel array, would require 7 hose clamps with header mounting clips attached to it. See picture below.

ROOF INSPECTION
Inspect the roof for any sharp projections that may damage the panels. If there are any vents, chimneys or other obstructions, layout the system before attaching the panels.
TOOLS AND MATERIAL PREP
A tool belt is not nessesary to install the panels but it sure does come in handy when you require easy access to the tools and materials you need to install the solar panels. Use a tool belt and or plastic tub to carry the stainless steel mounting screws and hose clamps onto the roof.
You will also need to have easy access
-
A caulking gun loaded with the roof sealant we provide in our DELUXE and PREMIUM kits
-
A variable speed drill loaded with a 3/8" nut driver to mount the stainless steel mounting clips to the roof
-
A 5/16" nut driver available to tighten down the hose clamps as you connect each panel together.